Saturday, March 14, 2009

Posting to blog from Word 2007

If you are blogging the Word 2007 has a very nice feature for you - you can post to your blog from Word 2007!

How to do this:

  1. Click the Office button in the top left corner
  2. Click Publish\Blog - it will open new window
  3. Register a blog account 
  4. Choose blog provider
  5. Provide user name and password
  6. Optionally click picture options - you can provide details for picture provider
  7. Now create your post and when it is ready click the Publish button

Except of posting directly to your blog, you can publish a post as a draft or open an existing post for editing!


Unfortunately it seems that there is one flaw - security. If you try to set blog provider to the blogger (I have not checked other providers) in Word 2007, it says that a user name and a password will be visible to other people... It is for sure not the way it should work. Revealing user/pass details to the whole world is just not good idea.

I was searching for a solution. But have not found anything yet. It is impossible that no one thought about the security.

If anyone knows how to use it a secure manner please leave a comment and let me know.

Thursday, March 12, 2009

What's new in .NET 3.5

Here are some of the new features and enhancements in .NET Framework 3.5. These are not all differences but I think the most interesting ones. Let's take a look.

Common Language Runtime:

new specialized collection HashSet<T>, EventSchemaTraceListener, Pipes support (anonymous and named) allows for interprocess communication for processes from local computer as well within network, improvements in Garbage Collector, new ReaderWriterLockSlim with performace comparable to lock statement in the Threading namespace and Time Zone enhancements

Networking

Peer-to-peer network support, Socket Performance enhancements

Windows Forms

WPF controls and content support in Windows Forms; ClickOnce improvements (deployment from multiple locations is now possible); Client Application Services – Web and Win-based applications can use these services to authenticate users and retrieve user roles and application settings from a shared server ;Vista support –existing Windows Forms applications have the same appearance as written especially for Vista.

LINQ

Linq to Objects, Linq to XML, Linq to SQL, Linq to DataSets (support for any generic database)

ASP.NET

client-centric and server centric AJAX controls; Visual Web Developer IntelliSense support for Java Script and MS Ajax Library

Saturday, March 7, 2009

Logging information - Trace Class


What are Trace statements
Trace statements are essentially printf style debugging. It allows to debug without a debugger. This kind of debugging was used before interactive debuggers were used.

How to use Trace class
Trace objects are active only if TRACE is defined-by default TRACE is defined in debug and release build projects in Visual Studio.

Similarly as Debug object, the Trace object uses TraceListeners to handle output.
If log data need to be stored in some particular way a custom trace listener can be implemented e.g. if data should be stored in database.
By default all logging information goes to the Output window. Let's see how to use a non-default listener, in this example we will use TextWriterTraceListener class.

FileStream objStream = new FileStream("C:\\AppLog.txt", FileMode.OpenOrCreate);
TextWriterTraceListener objTraceListener = new TextWriterTraceListener(objStream);
Trace.Listeners.Add(objTraceListener);
Trace.WriteLine("This is first trace message");
Trace.WriteLine("This is second trace message");
Trace.Flush();
objStream.Close();

In first line a FileStream object is created with file mode set to open or create.
Next the TextWriterTraceListener object is initialized with FileStream object.
To make it work the listener has to be added to Listeners collection of Trace class. Next the WriteLine method is used to log two text messages and finally the buffer is flushed to the output and FileStream is closed.
Notice that the default trace listener was not removed from the collection so whatever will be written using Trace class methods will go to all listeners from the collection, in this case will go to the Output window and will be logged to the AppLog.txt file.

How to control Trace from outside of application
Trace class can be controlled from outside of an application. Furthermore the configuration can be modified without rebuilding the application.
In order to configure trace we have to add the App.config file to the project which is basically XML file. After building a project the App.config file will change name to ApplicationName.exe.config where ApplicationName is actual application's Assembly name.

Let's take a look at following example.
<?xml version="1.0" encoding="utf-8" ?>
<configuration>
    <system.diagnostics>
        <trace autoflush="true" indentsize="2">
            <listeners>
                <remove name="Default"/>
                <add name="EventLogListener" type="System.Diagnostics.EventLogTraceListener" initializeData="MyEventLog"/>
            </listeners>
        </trace>
    </system.diagnostics>
</configuration>
All trace configuration should be placed under node. In above example we set two trace properties, the flush and the indent size. Next the default listener is removed, so the Trace will not write anything to the Output window. Next line we add a new listener of the type of EventLogTraceListener with a name of EventLogListener and we set an event source name to MyEventLog. Without writing a single line of code we added a a non-default trace listener. Isn't that great?

If above configuration is used you can find trace logs in the Event Viewer under Windows Logs/Application (click picture to enlarge).


How to use switches
Switches allow enabling or disabling tracing. In general there are two classes of switches BooleanSwitch (as name suggests has two possible states) and more interesting TraceSwitch class, which is basically multilevel switch with following possible levels
  • Off
  • Error
  • Warnings
  • Info
  • Verbose

There are two things which need to be done in order to use switches
  1. Define TraceSwitch object

    TraceSwitch theSwitch = new TraceSwitch("theSwitchName", "description");

    The first parameter is very important and enables to control the switch from outside of application. Second parameter is a description.
  2. Set the switch level.
    it can be done in the code e.g.

    theSwitch.Level = TraceLevel.Info;

    Or it can be configured from outside of application in already known config file, which is very useful since changes in configuration do not require rebuilding application!
<?xml version="1.0" encoding="utf-8" ?>
<configuration>
    <system.diagnostics>
        <switches>
            <add name="theSwitchName" value="3" />
        </switches>
    </system.diagnostics>
</configuration>
Possible values of trace level
Trace Level Value
  • Off 0
  • Error 1
  • Warnings(& errors) 2
  • Info(warnings & errors) 3
  • Verbose (everything) 4
If the value of theSwitch is set to 2 only two first messages are logged ( for error and for warning ).
Trace.WriteLineIf(theSwitch.TraceError, "Error tracing is on!");
Trace.WriteLineIf(theSwitch.TraceWarning, "Warning tracing is on!");
Trace.WriteLineIf(theSwitch.TraceInfo, "Info tracing is on!");
Trace.WriteLineIf(theSwitch.TraceVerbose, "VerboseSwitching is on!");


To remove some some overhead we can use switch in a following way:
if ( theSwitch.TraceWarning )
{
    Trace.WriteLine( "Warning tracing is on!");
}

To use Trace statements in efficient manner we have to analyze how much information is needed to solve a problem on a machine without development environment. Too large log files will make process slow and on the other hand with too little information the problem cannot be solved.

Tuesday, March 3, 2009

Defensive programming – Assertions


What are Asserts?
Assertions are key component for proactive programming. If they are used in a correct way they tell where and why error happened.
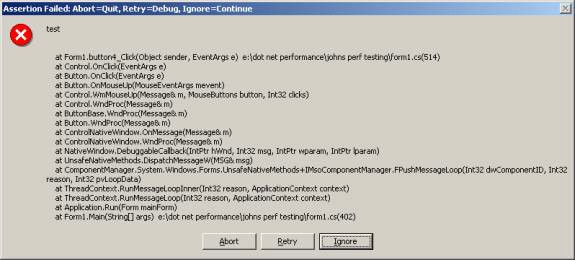
Assertion declares that some condition must be true, if it is not, the assert fails, bringing up message on failed condition (screen shot below).


Asserts are used only on Debug builds ( the DEBUG must be defined - it is enabled by default in debug builds in Visual Studio )
If you will take a look in a retail build assembly using the .Net Reflector tool the Debug.Assert(...) code will not be in the assembly.


How to Assert?
There are two basic rules:
  1. Assert must not change values or state of program (treat as read only)
  2. Rule: Check a single item at a time.

What to Assert?
Generally you should use Asserts for:
  1. Parameters coming into method. Sometimes better approach is to throw InvalidArgumentException
  2. Values returned by methods; on wrong returned program may die after 20 minutes (Asserts help! )
  3. Use asserts when you need to check for assumption (e.g. Available memory )

How to use Asserts in .Net Framework

The Debug class is defined in System.Diagnostics namespace. The Debug class methods allows to print debugging information and check application logic with assertions, making more robust without impacting the performance and code size of retail assemblies.

The Debug class except of Assert method, in which we are the most interested, provides following write methods: Write, WriteIf, WriteLine and WriteLineIf.

Lets take a look at the Debug.Assert method, There are three overloaded versions of the method.
  • Debug.Assert(i > 10);
  • Debug.Assert(i > 10, "i > 10");
  • Debug.Assert(i > 10, "i > 10", " i should be greater than 10, if you see this it means that it was not ;)");
The first parameter is a boolean condition, second is a string message and the third parameter is a string detailed message.
  • If assert is used in a similar way as below it does not tell us which parameter was bad
// wrong way to write assertion. Which param was bad?
public static void DoStuffWithObject1(int i, object o, int iLen)
{
    Debug.Assert((i > 0) && (null != o) && (iLen < MAXVAL ));
}
  • And here is the right way of doing this
// right way to write assertion - every param individually
public static void DoStuffWithObject2(int i, object o, int iLen)
{
    Debug.Assert(i > 0);
    Debug.Assert(null != o);
    Debug.Assert(iLen < MAXVAL ));
    ...
}
  • Asserts should check a value completely, in following example we expect that a parameter will be a valid customer name, what happens if an empty string is passed?
// incomplete checking 
public static bool GetCustomerName(string CustName)
{
    Debug.Assert(null != CustName, "null != CustName");

    return true;
}
  • And here example of complete checking
// complete checking
public static bool GetCustomerNameBetterChecking(string CustName)
{
    Debug.Assert(null != CustName, "null != CustName");
    Debug.Assert(0 != CustName.Length, "CustName is EmptyString");

    return true;
}
  • Be careful because improper using of Asserts can crash application!
    if the null is passed as a parameter the NullReferenceException is thrown
// Assert that crashes application if CustName is null
public static bool NullReferenceExceptionCrash(string CustName)
{
    Debug.Assert(CustName.Length > 0);

    return true;
}